
Craft Corner · Paper and cardboard
Free paper craft lessons: Craft Corner
Craft Corner has six step-by-step paper and cardboard projects: paper cup, dart paper airplane, accordion fan, paper weave mat, pop-up greeting card and cardboard picture stand. Each one lists its materials, time and difficulty, shows every step as a fold diagram and adds a safety note.
These steps and drawings are Forge originals. A person has not yet test-folded them on real paper, so if a step does not work out, look at the next picture and adjust.
Craft Corner remembers your place in each project in this browser only, and you can print all the steps.
Every lesson is free: no ads, no lives and no paywall.
What you'll learn
- Paper cup: paper fold, easy, about 5 minutes
- Dart paper airplane: paper fold, easy, about 5 minutes
- Accordion fan: paper fold, easy, about 10 minutes
- Paper weave mat: paper weave, medium, about 25 minutes
- Pop-up greeting card: card, medium, about 20 minutes
- Cardboard picture stand: cardboard, medium, about 20 minutes
Every project, step by step
Paper cup
Paper fold · Easy · about 5 minutes
You need: One square of paper (15 cm / 6 in or larger).
- Fold a triangle. Turn the square so it looks like a diamond. Fold the top corner down to meet the bottom corner and crease along the middle.
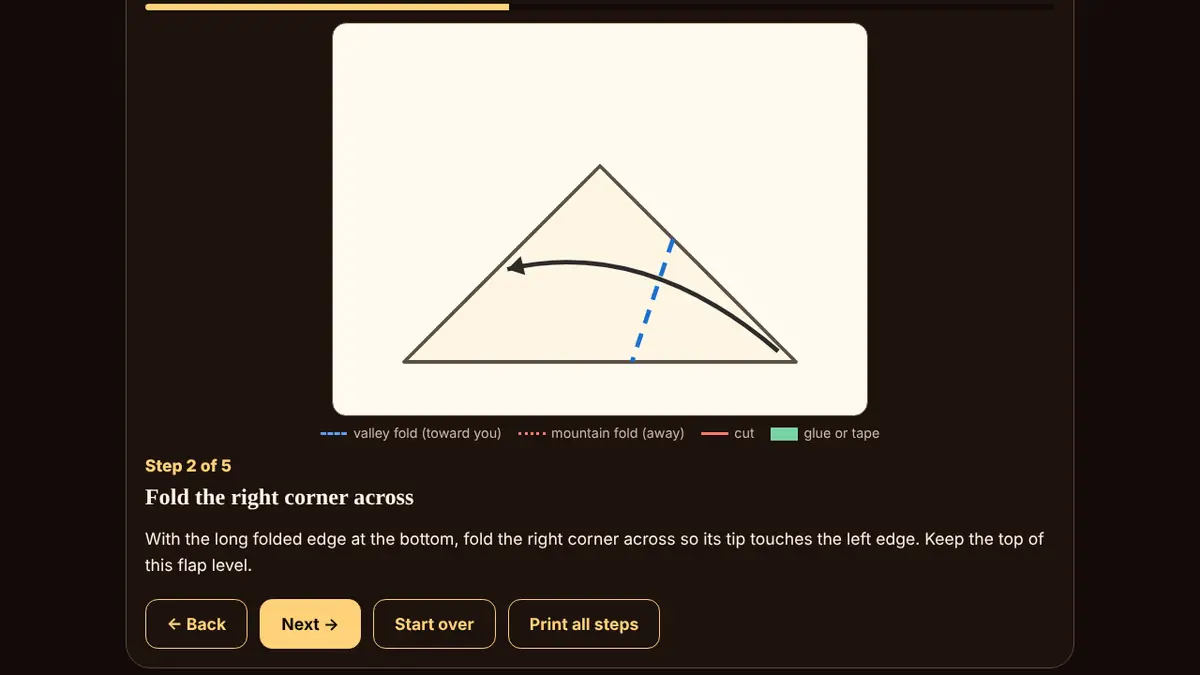
- Fold the right corner across. With the long folded edge at the bottom, fold the right corner across so its tip touches the left edge. Keep the top of this flap level.
- Fold the left corner across. Fold the left corner across in the same way, so its tip touches the right edge on top of the first flap.
- Fold the top flaps down. There are two layers at the top point. Fold the front layer down over the front. Turn the cup over and fold the back layer down the other side.
- Open the cup. Gently squeeze the two side corners toward each other to open the top. Push the bottom up slightly so it stands.
Safety: Paper cups are for play or dry snacks; they go soft when wet.
Dart paper airplane
Paper fold · Easy · about 5 minutes
You need: One rectangle of printer paper (A4 or US Letter).
- Crease the middle. Hold the paper upright. Fold it in half the long way, crease firmly, then unfold it again.
- Fold the top corners in. Fold both top corners in so their top edges lie along the middle crease, making a point.
- Fold the edges in again. Fold each new slanted edge in to the middle crease once more, so the point becomes sharper.
- Fold in half. Fold the plane in half along the middle crease, with the folded flaps on the outside.
- Fold the wings down. Lay it on its side. Fold the top layer down along a line from the nose to the tail, so the wing edge lines up with the bottom of the body. Turn over and repeat.
- Shape and fly. Open the wings so they are level. Hold the body underneath and throw gently forward, nose slightly up.
Safety: Throw gently, away from people, faces and animals.
Accordion fan
Paper fold · Easy · about 10 minutes
You need: One rectangle of paper and Tape or a glue stick.
- Lay the paper flat. Lay the rectangle with a long side running left to right.
- First fold. Fold a strip about 2 cm (1 in) wide over from the left edge and crease it.
- Fold back and forth. Turn the paper over and fold the next strip back the other way, the same width. Keep going across the whole sheet, like a zigzag.
- Fold the pleats in half. Squeeze the zigzag into a narrow stack. Fold the stack in half at the middle and pinch the bottom.
- Join the middle. Tape or glue the two inside edges that meet at the middle together. Let go and the fan opens out.
Safety: Keep tape and glue away from very young children’s mouths.
Paper weave mat
Paper weave · Medium · about 25 minutes
You need: Two sheets of paper in different colors, Scissors, Ruler and pencil and Glue stick.
- Cut slits from the fold. Fold sheet one in half. Starting at the fold, cut straight lines toward the open edges about 2 cm (1 in) apart. Stop 2.5 cm (1 in) before the edges.
- Unfold. Open the sheet. You now have a frame with long slits across the middle.
- Cut strips. From sheet two, cut strips about 2 cm (1 in) wide and a little longer than sheet one is wide.
- Weave the first strip. Push a strip through the slits: over, under, over, under, all the way across.
- Alternate the next strip. Start the next strip the opposite way: under, over, under. Slide each strip up snugly against the last one.
- Glue the ends. When the frame is full, glue each strip end to the border and trim any extra.
Safety: Uses scissors: children should have an adult help, and cut away from fingers.
Pop-up greeting card
Card · Medium · about 20 minutes
You need: One sheet of thin card or paper, Scissors, Glue stick, Pens or crayons and A small picture (drawn or cut out).
- Fold the card. Fold the sheet in half to make a card and crease it well.
- Mark two lines. Keep it folded. On the folded edge, draw two short lines about 3 cm (1.25 in) long and 3 cm apart, straight in from the fold.
- Cut the lines. Cut along both lines through both layers. Do not cut further than the lines.
- Crease the tab. Fold the cut tab over and back to crease it at the end of the cuts, then unfold it.
- Push the tab inside. Open the card halfway. Push the tab through to the inside so it folds the other way and stands up like a small step. Close the card and press.
- Add your picture and message. Glue your picture to the front of the step (not to the card behind it). Decorate the front and write your message inside.
Safety: Uses scissors: children should have an adult help, and cut away from fingers.
Cardboard picture stand
Cardboard · Medium · about 20 minutes
You need: Thin cardboard, such as a cereal box, Ruler and pencil, Scissors and Strong tape.
- Cut a long rectangle. Cut a rectangle 8 cm × 24 cm (about 3 × 9.5 in) from the cardboard.
- Mark and score two lines. Draw lines across at 8 cm and 16 cm so the strip has three equal parts. Press hard along each line with the ruler edge and an empty pen to make it easy to fold.
- Fold into a triangle. Fold along both lines the same way so the ends meet and the strip makes a triangle tube.
- Tape the joint. Tape the two meeting edges together firmly along the full length.
- Add a ledge. Cut a strip 2 cm × 8 cm. Fold it lengthwise into an L and tape it along the bottom of one sloping side to make a ledge.
- Lean and display. Stand it on one flat side and lean a photo or a light phone against the ledge.
Safety: Uses scissors: children should have an adult help, and cut away from fingers. Do not use a craft knife without an adult. Holds a photo or a light phone, not a tablet.
Questions
Is Craft Corner really free?
Yes. Every lesson is free: no ads, no lives and no paywall. There is no account to make, and your progress is saved in your own browser.
What do I need?
Mostly paper. Some projects need scissors, glue or tape, or a piece of cardboard; each project lists its materials.
Have the steps been tested?
Not yet by a person on real paper. They are Forge originals, so adjust if a step does not work out.